
There is a YouTube video explaining how to use my Goodnotes template at the end of this blog post! Templates are currently being updated for 2024, and will be added to the downloads page in December.
I have been using a digital work journal for a little over a year now and I will never go back to using a paper journal for work, as a digital journal is so much more practical. Benefits include the ability to erase, cut, copy and paste notes and reorganise your thoughts; search on words (to find that contact you scribbled down eons ago); add pictures and other resources; send people copies of meeting notes; and many more. As an added bonus, there is a huge range of digital graphic sets available for purchase at reasonable prices online, allowing you to beautify your journal as you would a paper journal with stickers. The best thing is being able to create templates specifically designed to meet your needs.
My digital setup
I have a 10.5 inch iPad Pro from several years ago on which I have Goodnotes 5. I prepare my templates on my computer using Affinity Publisher, having previously used Adobe InDesign but sadly unable to justify the subscription fee to continue using it on my new computer. I buy my graphics files from sites like Creative Market, but you can also find graphic sets available for sale on Etsy and a multitude of other individual sites and platforms. While I can draw, I don’t like to spend significant amounts of time creating graphics for my work journal, as my aim is for it to be an efficient and time-saving device. I get just as much creative satisfaction from using graphics by other people, and in a small way I’m supporting small businesses. Please note that the graphics sets I use on these templates and on my website were all purchased under a commercial licence that allows me to use those graphics on items that may be sold 5,000 times each. I have other graphics sets purchased under a personal licence that I use to decorate my daily pages in my personal version (as you will see on example pages below).
Creating a Goodnotes template
Last year, I created a template for my Goodnotes work journal that was based on the recommended Goodnotes page size. What I found was that the only time the whole page displayed on your iPad was when you had the page in read-only mode.
In edit mode and especially when you had more than one notebook open, the page was cropped, meaning you had to scroll up the page to see the bottom lines. To overcome this, I designed this template with a shorter page that is 6.32 x 7.5 inches. I didn’t use a master page, as there was no feature that appeared in the same place on every page.
Once I had my page size sorted, it was a simple matter of laying out and decorating each page, and the cover is a bit of fun that lets you display your graphics creatively.
Index with hyperlinks
This is the page that is most critical to get right in your publisher software. Once you have a list of the pages you want to link to, you create a hyperlink from each page name on that list to the relevant page in the document. Even though you will add additional pages in Goodnotes as you use your journal, the links will still connect each item in your index to the page you have chosen. I like to also add a link back to the index on each of my main pages. Last year I made tabs rather than an index. While feasible it takes a lot more time to create but if you want your notebook to look more like a real paper journal its definitely possible. Despite being able to test the links in the development software, you may find you still need to export the document a few times into Goodnotes to test the hyperlinks before you get them exactly right!
How to use my Goodnotes notebook template
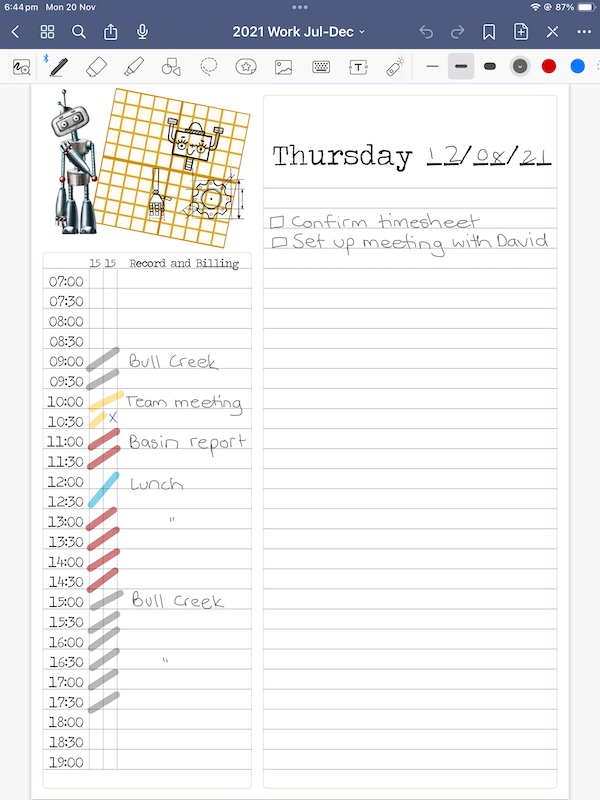
In the notebook I’ve included a future log, notes pages, a way to track priorities, monthly logs, daily pages, and blank pages of a couple of styles. The future log comes in two forms: the first is a lined page that you can use to record ideas or information you might need in the future. Events and tasks that have a set date are recorded in the calendar style future log. Don’t forget that in a digital notebook, it’s very easy to erase things that change, so you could record a possible future activity such as “Need to set up a meeting with Jack and Jill” in your lined future log page, and then once you have a date, erase this note from the lined future log and transfer the relevant information to your calendar.
Following the future log there are two types of notes pages: one lined and one blank. I like a blank one for mind-mapping – I’m a very visual person. These pages are for absolutely anything. I’ve used them to work through ideas for a project, record project numbers, list what type of cakes everyone at my work prefers (😜), or track overtime.
The Priorities page uses the Eisenhower Matrix to help you sort your work into ‘buckets’. You will have your own way of determining the priority of your tasks, but this template allows you to list them under ‘do now’, schedule for later, ‘park it’ for when you have some spare time, or rethink it. The final box may not be used often because you may just decide to delete the task, but there will be the odd occasion that you place something there to be restructured because there was a good idea in there somewhere.
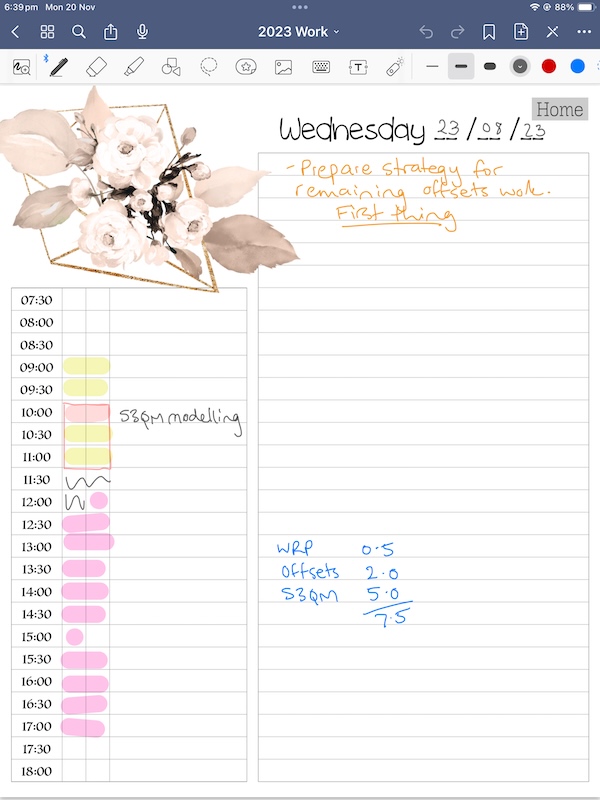
I’ve then provided a monthly log for recording deadlines, events etc either side of the day; your daily logs which include a planner to record events or track time spent on tasks and space for notes, and spare lined pages for additional notes; and finally a dotted page if you need to draw diagrams. You could always use this dotted page, or the blank page template in your Goodnotes app to create a layout in the app itself using their shapes feature and highlighters, but it’s quite clunky and takes a lot of pen control. There is nothing to stop you downloading/purchasing other templates you like online and adding them to this one, for instance if you would like a weekly layout to use.
The other page I’ve provided is a weekly review page. It’s up to you how you use this page, or whether you use it, but I highly recommend including a weekly review, as it’s very beneficial. Think about what you achieved, what was disappointing, note down any tasks that you might need to migrate forward, or ideas you’ve had.
Adding the template to Goodnotes
When you download the template (or any PDF file suited to Goodnotes), your iPad will ask you what app you would like to open the file in. Select Goodnotes and click on ‘Import as New Document’. You can now use the template.
Adding a page to your templates (dailies)
Open the template to the page you want to use as a template, such as the daily logs or the weekly review. Using the ‘Share and Export’ tab, select ‘Export this page’ and save it as a file on your iPad. Make sure you save it as a PDF. Go back to the Documents page, where all your Goodnotes pages are listed and click on the ‘Settings’ wheel in the top right corner. There you can select ‘Notebook Templates’. You can press the plus at the top right to create a new folder for templates, and then once you have your folder, you simply press on the plus in the circle that says ‘Import’, then select ‘From Files’. Now you can go back to your notebook, add a page and select the one you want from your templates. Easy! I save the notes page, all the daily logs, the weekly review and the lined and dotted pages as templates, so I can add them as often as I need. This process is the one to follow if you want to add pages you’ve sourced from other places or made yourself. Any PDF can be added, just be aware they may be based on different page sizes. This won’t affect the function of your notebook at all.
Tips
🔧 You are not restricted in any way in how you use the template I have provided. You can choose which pages you’d like to use, and delete the ones you don’t want to use.
🔧 You can add pages from other notebooks, any PDF, and any purchased file.
🔧 I love graphics, so I went exploring, spent some money, and I now have a ‘theme’ each month in my notebook where I use one graphic set for the whole month, exploring different ways to lay out the graphics. The best thing about adding pictures is the picture can’t be erased or affected at all in writing mode; pictures are only deleted if you go back to the picture mode and select the actual picture. Keep in mind that in Goodnotes pictures have to be added in the order you want them to appear. You can’t change the order later.
🔧 Pages can be exported to use elsewhere.
🔧 The template itself can’t be changed. You can write, erase, add pictures etc and you won’t affect the template.
🔧 You can write with your finger, and there’s always the handwriting to type feature, or you can write in text boxes, but easiest is using an Apple Pencil/stylus.
🔧 The instructions in this blog may differ for Android users.
🔧 You can save your favourite pages and view them in the Favourites tab.
Where do I get this template?
Go to my downloads page! Templates are currently being updated for 2024, and will be added to the downloads page in December.